

Ingredients
Rough Puff Pastry
300 g plain flour
1 teaspoon salt
300 g unsalted butter, at room temperature (but not soft) 150 ml ice-cold water
Pear Filling
1 x quantity of rough puff pastry
100 g unsalted butter, softened
300 g caster sugar
1 vanilla bean, split and seeds scraped
1 cinnamon quill (optional)
12 large pears (Peckham or firm Bosc), peeled, cut in half and cored
Method
Rough Puff Pastry
1. Begin by sifting the flour and salt directly onto your work surface.
2. Cut the butter into 1 cm dice and scatter it over the flour, then rub the butter into the flour with your fingertips, ensuring there are still chunks of butter remaining throughout. These lumps of butter will transform into pockets of steam later on, contributing to the flakiness of the pastry.
3. Make a well in the centre of the flour mixture and pour two-thirds of the water into the well. Use your hands to draw flour from the outside into the middle, little by little, adding more water if necessary until the dough eventually forms a shaggy ball. Flatten the dough out to a 3 cm high square and rest in the fridge for 30 minutes. I like to swaddle the pastry in a clean tea towel at this stage – it saves plastic film and makes it easier to move the pastry from bench to fridge during the upcoming turns.
4. Dust your work surface with flour. Remove the dough from the fridge, place it in the centre of the flour and dust a little more flour over the top. Roll the dough in one direction away from you until it is three times the length it was to start with, adding a little flour along the way to prevent the pastry from sticking to the rolling pin. You may even notice the pastry sticking to the bench. If it does, just stop rolling and use your hands to release it from the bench; hold it up as you sprinkle more flour on the work surface, then continue to roll it out. Try to keep the dough looking like a rectangle with sharp corners and neat edges. The more care you take during this process the better the pastry will be.
5. Now fold the two ends of the pastry into the centre of the rectangle so that they meet in the middle, then fold them over one another. You should now have what looks like a book sitting in front of you; this is your first ‘book’ turn. Wrap the pastry and rest in the fridge for 30 minutes. Remove the pastry from the fridge and roll it again, making sure the open seams of the pastry are parallel to your body as you roll it in the opposite direction as before. Cover and return to the fridge for another 30 minutes. The pastry is now ready to use.
6. This puff pastry will keep well in the freezer for up to 3 months. Before freezing I like to roll it out, then roll it around an old cardboard cylinder (from baking paper or such like). If you wrap this in plastic film you have rolled puff pastry ready to use at a moment’s notice.
Pear Filling
1. Make the rough puff pastry, completing all the turns, and allow it to rest overnight in the fridge before rolling it out.
2. Line a baking sheet with baking paper.
3. For this recipe, I use the oldest, most scratched frying pan I can get my hands on. The reason for this is that the pears should catch on the pan, resulting in those burnished marks that are characteristic of the best French tarte tatin. The only other pan that gives this result is a copper pan, which not many of us can lay claim to owning. It doesn’t really matter what size you use. I use a 30 cm frying pan that fits 12 pears, so just amend the number of pears you use according to the size of your pan and then cut the pastry into a round that is 10 cm larger in diameter. If you have a 30 cm pan like me, lightly dust the work surface with flour and roll the pastry into a 40 cm round. Slide the pastry onto the prepared baking sheet and place it in the freezer to rest while you cook the pears.
4. The best way to prepare the pan for tarte tatin is to spread the softened butter evenly over the base with a spatula, as if you are buttering a slice of bread. If the butter is cold just slice it as thinly as you can, then distribute it over the base. Sprinkle the sugar evenly over the butter, then add the vanilla seeds and bean, along with the cinnamon quill (if you are using one).
5. Place the pan over medium heat and leave it undisturbed to allow the butter the melt down with the sugar. Once the sugar starts to caramelise give the pan a little swirl to even out the colour, but try to avoid stirring the sugar otherwise it may crystallise. Continue to cook until the caramel is golden, then remove the pan from the heat and add the pears, cut-side up, keeping them really close to one another – almost overlapping. The pan will be big enough to have two complete circles of pears and one pear half in the centre. Return the pan to medium heat and cook the pears in the caramel for another 10 minutes, shaking the pan occasionally to loosen any fruit stuck to the bottom. Remove the pan from the heat and set aside to cool for 10 minutes.
6. Preheat the oven to 200°C.
7. Because of the residual heat left in the pan it is best that the pastry is super cold, which is why I suggested you put it in the freezer. After the pears and caramel have been cooling for 10 minutes remove the pastry from the freezer. Initially the pastry will be rigid so just use your hands to warm the edges a little and make it more pliable, then place it evenly over the pan. Use a fork or dessert spoon to tuck the pastry edges under the pears around the outside of the pan, working as quickly as you can so the pastry doesn’t melt.
8. Bake the tarte tatin for 25 minutes, then reduce the temperature to 180°C and bake for a further 20 minutes or until the pastry is puffed and golden. Remove it from the oven and cool for 5 minutes.
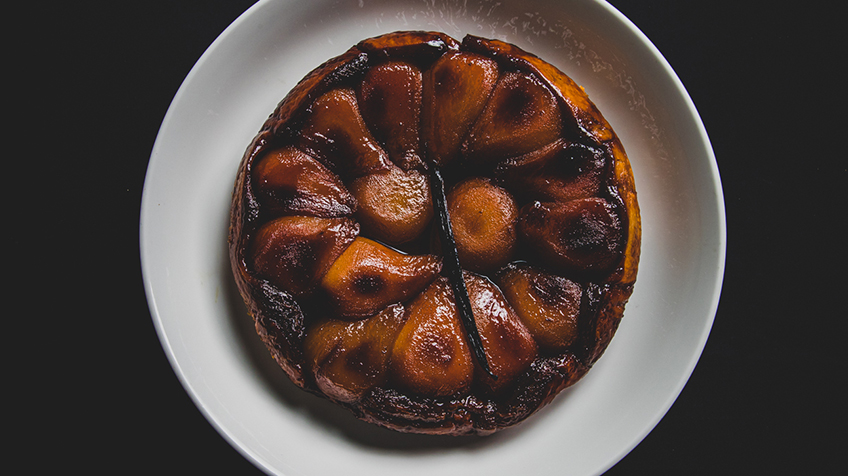
9. To turn out the tarte tatin, give the pan a shake to make sure there is no pastry stuck to the edges, then invert a serving plate over the top. Holding the plate with one hand and the handle of the pan with the other, flip the pan upside-down so the tart falls onto the plate. Lift off the pan to reveal your amazing tarte tatin. If any fruit has stuck to the base of the pan, just loosen it and gently press it back onto the tart. No one will notice. Serve immediately.
10. The tarte tatin can be baked up to 6 hours in advance and left in the pan until you are ready to eat. Before serving, just reheat it in a 180°C oven for 10 minutes before turning it out.
Watch a video of Nadine preparing the Pear Tarte Tatin
In 2021, Carriageworks partnered with Smeg Australia to film a variety of recipes including this one. Watch the video.